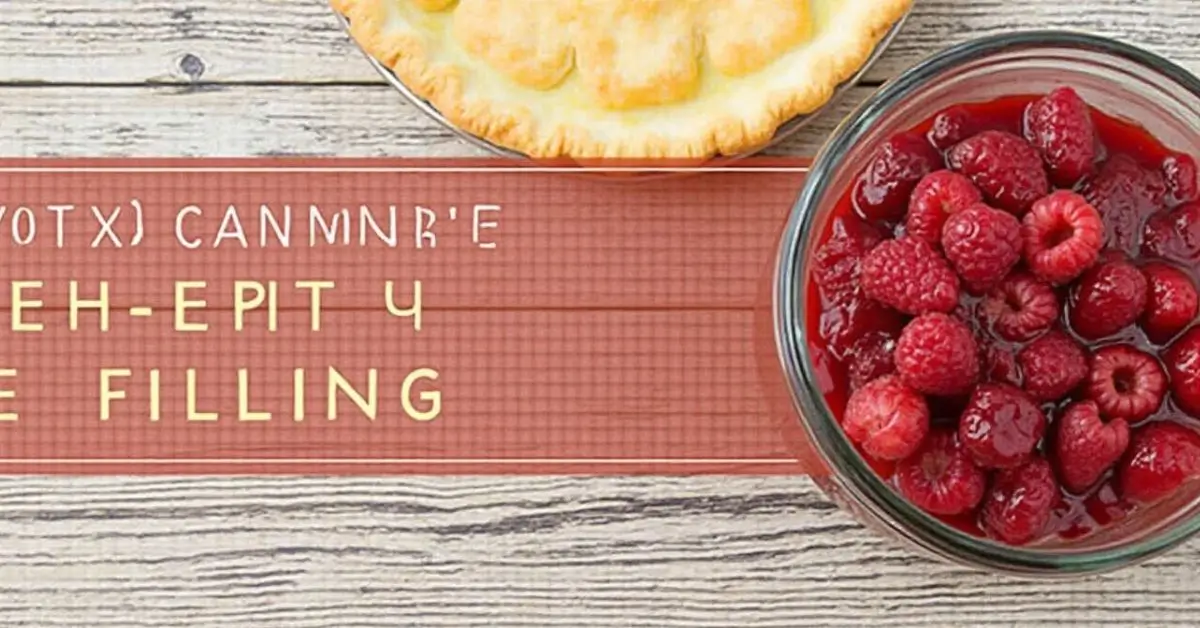
How to Preserve the Perfect Raspberry Pie Filling?
Have you ever wished you could enjoy the sweet, tangy flavor of fresh raspberries all year round? Whether you love baking or just want to add a homemade touch to your desserts, learning the RECIPE FOR CANNING RASPBERRY PIE FILLING is a game-changer!
By canning your own pie filling, you’re not just saving money—you’re ensuring a healthier, preservative-free alternative to store-bought versions. Plus, it’s incredibly versatile—perfect for pies, cheesecakes, pastries, or even drizzled over pancakes and waffles!
Table of Contents
⭐ Why You’ll Love This Recipe
✔ Healthier & Natural – No artificial preservatives, just fresh raspberries and wholesome ingredients.
✔ Quick & Easy – A straightforward canning process that takes under an hour!
✔ Long-Lasting – Store it for up to a year and enjoy homemade goodness anytime.
✔ Customizable – Adjust the sweetness and thickness to match your taste preferences.
🍽 A Kitchen Essential for Every Home Baker
Imagine pulling out a jar of homemade raspberry pie filling in the middle of winter, spreading it over a warm, flaky crust, and savoring the taste of summer berries. With this RECIPE FOR CANNING RASPBERRY PIE FILLING, you’ll always have a delicious, homemade dessert base at your fingertips.
🍓 What Makes This Recipe Special?
If you’re looking for a simple, foolproof way to preserve fresh raspberries while creating a versatile, homemade dessert filling, then this RECIPE FOR CANNING RASPBERRY PIE FILLING is just what you need!
Not only does it capture the vibrant flavor of summer raspberries, but it also ensures you always have a ready-to-use filling for pies, tarts, cheesecakes, and more—no last-minute grocery runs needed.
⏳ Quick & Easy with Minimal Effort
✔ Preparation Time: 30 minutes
✔ Cooking Time: 20 minutes
✔ Total Time: Less than an hour!
✔ Skill Level: Beginner-Friendly
You don’t need to be a pro at canning to make this work! With simple ingredients and easy-to-follow steps, this recipe ensures a smooth and stress-free canning process—even if it’s your first time.
🌿 Healthier & More Natural Than Store-Bought
Many store-bought pie fillings are packed with high-fructose corn syrup, artificial colors, and preservatives. This RECIPE FOR CANNING RASPBERRY PIE FILLING uses:
✅ Fresh raspberries – loaded with antioxidants and vitamins
✅ Lemon juice – enhances flavor and ensures proper preservation
✅ Clear Jel or cornstarch – for a perfectly thick consistency
✅ No artificial preservatives – just wholesome, natural goodness
🎯 A Versatile Must-Have for Dessert Lovers
Once you have a few jars of homemade raspberry pie filling, the possibilities are endless! You can use it to:
✔ Make delicious raspberry pies in minutes
✔ Top cheesecakes, ice cream, and pancakes
✔ Fill pastries, hand pies, and turnovers
✔ Blend into yogurt or oatmeal for a fruity twist
This RECIPE FOR CANNING RASPBERRY PIE FILLING is not just about convenience—it’s about bringing out the best in your raspberries while ensuring freshness for months to come! Let’s dive into the step-by-step process and start canning! 🍇✨
Essential Ingredients for the Perfect Raspberry Pie Filling
To create the perfect canning raspberry pie filling, you’ll need just a few key ingredients that work together to provide a smooth, sweet, and tangy filling. Each ingredient plays a crucial role in achieving the right texture and preserving the fresh raspberry flavor.
Here’s a breakdown of what you’ll need and why these ingredients are so important in this RECIPE FOR CANNING RASPBERRY PIE FILLING:
🥄 1. Fresh Raspberries
- Why They’re Important: The star of the show! Fresh raspberries provide the vibrant flavor and bright color that make your pie filling rich, flavorful, and full of natural antioxidants.
- Health Benefits: Raspberries are high in vitamin C, fiber, and antioxidants, making them not only delicious but great for boosting your immune system and promoting digestive health.
- Substitution: If fresh raspberries are out of season, you can substitute with frozen raspberries—just make sure to thaw them and drain excess moisture before using.
🍬 2. Sugar
- Why It’s Important: Sugar helps to sweeten the tartness of the raspberries and acts as a preservative in the canning process. It enhances the flavor and contributes to the thickening of the filling when combined with the starch.
- Health Consideration: While sugar is essential for this recipe, feel free to experiment with natural sweeteners like honey or maple syrup for a more natural approach.
- Substitution: If you’re reducing sugar for health reasons, you can try stevia or monk fruit sweetener as alternatives, but the consistency may vary slightly.
🍋 3. Lemon Juice
- Why It’s Important: Lemon juice not only adds a hint of tartness to balance the sweetness but also helps to preserve the filling by maintaining the right level of acidity.
- Health Benefits: Vitamin C from lemon juice adds an extra health boost while also contributing to the preservation of nutrients in your raspberries.
- Substitution: If you don’t have fresh lemons, bottled lemon juice works as a substitute, or you can use lime juice for a unique twist.
🌾 4. Clear Jel (or Cornstarch)
- Why It’s Important: Clear Jel is a modified starch that thickens your pie filling without becoming cloudy, creating a smooth, glossy finish. It’s essential for giving your filling the right consistency.
- Health Consideration: Clear Jel is a safe, gluten-free option for thickening, so it’s perfect for anyone with dietary restrictions.
- Substitution: If you can’t find Clear Jel, cornstarch is a good alternative, though it may create a slightly different texture.
💧 5. Water
- Why It’s Important: Water is necessary to dissolve the sugar and help distribute the thickening agents, creating a syrupy base for the filling.
- Substitution: You can also use fruit juice (like raspberry or apple juice) for added flavor complexity.
🧂 6. Optional – Pectin
- Why It’s Important: While pectin isn’t always required, it can help thicken the filling more quickly and prevent it from being too runny after canning.
- Substitution: If you prefer to avoid pectin, simply use more Clear Jel or cornstarch to achieve the desired consistency.
🌿 Variations to Try
While this RECIPE FOR CANNING RASPBERRY PIE FILLING is delicious as is, you can customize it based on your preferences:
- Add Spices: Try adding a pinch of cinnamon or nutmeg for a warm, cozy flavor.
- Raspberry-Lemon Twist: Add some extra lemon zest for a brighter, citrusy kick.
- Combine with Other Fruits: Blend in some blueberries, strawberries, or blackberries to create a mixed berry pie filling.
🍽 Making This Recipe Your Own
This RECIPE FOR CANNING RASPBERRY PIE FILLING is easy to modify, making it a go-to recipe for preserving fresh fruit in creative ways. Feel free to experiment with your preferred level of sweetness or add new flavor combinations to keep your pie fillings exciting.
With just a few essential ingredients, you’re ready to create a homemade raspberry pie filling that’s healthier, fresher, and more delicious than anything you’ll find in a store! 🍇✨
Step-by-Step Instructions for Canning Raspberry Pie Filling
Ready to preserve that sweet raspberry goodness in the form of a delicious homemade pie filling? Follow these easy steps to master the RECIPE FOR CANNING RASPBERRY PIE FILLING. Whether you’re a beginner or experienced canner, these clear, simple instructions will help you create a perfectly thickened, flavorful raspberry filling that you can enjoy all year long!
🧑🍳 Step 1: Prepare Your Jars and Canning Equipment
Before you start, make sure your canning jars and lids are properly sterilized. This ensures that your pie filling stays fresh and safe for storage.
- How to sterilize:
- Boil your canning jars and lids for 10 minutes or place them in the dishwasher on a hot cycle.
- Keep the jars warm by placing them in a pot of hot water until you’re ready to fill them.
- Clean your canning funnel and ladle with hot soapy water to avoid contamination.
🍓 Step 2: Prepare the Raspberries
- Wash & Prep: Gently rinse your fresh raspberries under cold water to remove any dirt or debris. Be careful not to crush them.
- Measure: Measure about 6 cups of raspberries for this recipe. Fresh raspberries give the best flavor, but you can use frozen raspberries as well—just be sure to thaw them and drain excess water.
🍬 Step 3: Cook the Raspberry Filling
- In a large saucepan, combine the following ingredients:
- 6 cups of raspberries
- 2 cups of sugar (adjust to your preferred sweetness level)
- 2 tablespoons of lemon juice
- 3 tablespoons of Clear Jel (or cornstarch if you prefer)
- 2 ½ cups of water
- Cooking Tip: Stir constantly over medium heat to prevent burning and to help dissolve the sugar and thickening agents.
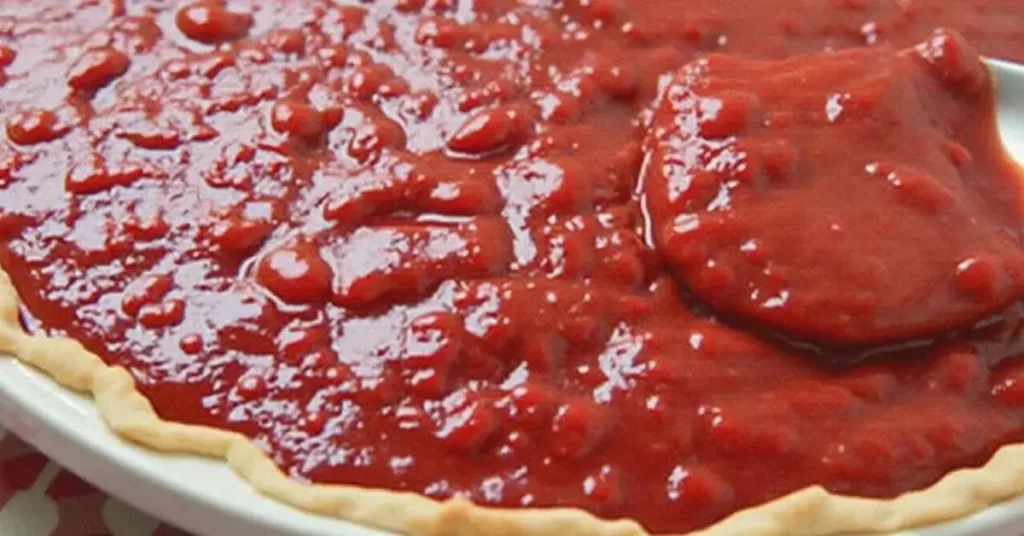
- Once the mixture reaches a simmer, continue to stir until it thickens to a gel-like consistency. You’ll know it’s ready when it holds its shape on the spoon and coats the back of it. This usually takes about 10-15 minutes.
🍋 Step 4: Check for Thickness
- Consistency Tip: If the filling isn’t thick enough, add an extra tablespoon of Clear Jel or cornstarch mixed with a small amount of water. Stir well and bring it back to a simmer.
- Optional – Add Lemon Zest: If you want to brighten up the flavor, add a bit of lemon zest at this point.
🏺 Step 5: Fill the Jars
- Using a canning funnel, carefully ladle the hot raspberry pie filling into your warm sterilized jars. Leave about 1 inch of headspace from the top of the jar to ensure proper sealing.
- Tip: Wipe the rims of the jars with a clean towel to remove any filling or residue before applying the lids. This helps create a proper seal and avoids spoilage.
🛑 Step 6: Process the Jars
- Place the filled jars in a water bath canner (or a large pot with a rack) and cover with water.
- Once the water hits a rolling boil, carefully lower your jars into the pot and let them bubble away for 10 minutes. This boiling water bath locks in freshness and ensures a secure seal—key for shelf-stable pantry magic! This step ensures that the lids seal properly and the filling stays fresh for long-term storage.
- Tip: Make sure the water covers the jars by at least 1-2 inches.
❄️ Step 7: Let the Jars Cool and Check for Seal
- After processing, carefully remove the jars from the water bath and place them on a clean kitchen towel. Let them cool completely, which can take a few hours.
- Seal Check: Press the center of each lid. If it doesn’t pop back, it means the jar is sealed. If it pops, simply refrigerate the jar and use it within a week.
- Storage Tip: Properly sealed jars can be stored in a cool, dark place for up to 12 months.
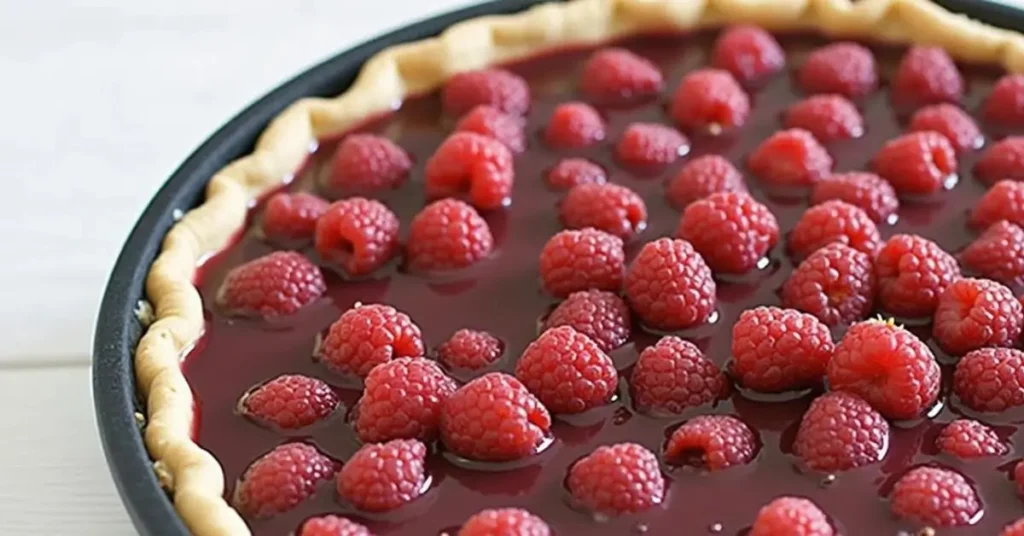
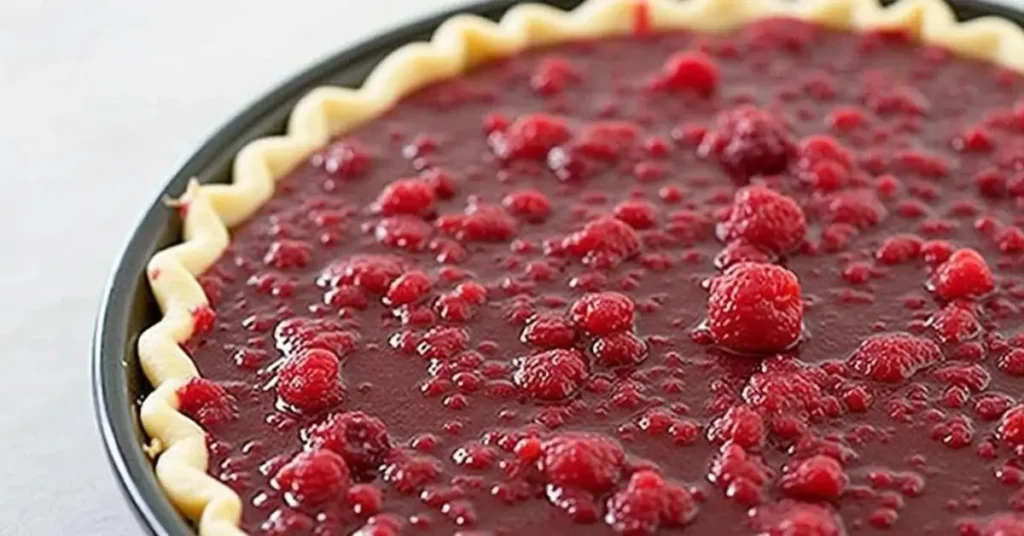
🍽 Step 8: Use Your Raspberry Pie Filling
- Once the jars are sealed, you have a long-lasting supply of raspberry pie filling ready to go for pies, tarts, or even a spoonful on top of pancakes!
- When you’re ready to use the filling, just open the jar and pour it into a pie crust or dessert of your choice.
💡 Tips for Success with This Recipe for Canning Raspberry Pie Filling
- Even Consistency: Make sure to stir the filling continuously while cooking to prevent lumps and ensure the thickening agents work properly.
- Sugar Substitution: Feel free to use honey, maple syrup, or stevia as a healthier alternative to sugar. Just keep in mind that it may slightly affect the thickness.
- Double the Recipe: This recipe can easily be doubled for more jars, but make sure you have enough canning supplies!
- Freeze for Later: If you don’t want to can it, freeze the raspberry filling in containers and use it within 3 months.
With these step-by-step instructions, you’ll be able to make the RECIPE FOR CANNING RASPBERRY PIE FILLING with ease and confidence. You’ll enjoy the health benefits of fresh fruit, the convenience of having homemade filling ready at any time, and the satisfaction of creating your own preserves. Happy canning! 🍇✨
Assembly: How to Build Your Raspberry Pie Filling
Now that you’ve prepared all the ingredients for your RECIPE FOR CANNING RASPBERRY PIE FILLING, it’s time to assemble the filling and get it ready for canning. This step is all about combining everything in just the right way to achieve that perfectly thickened, flavorful filling that will make any pie a hit. Whether you’re preserving it for later or using it right away, the assembly process is crucial for ensuring the filling holds its shape and tastes incredible.
🧑🍳 Step 1: Combine the Ingredients for the Raspberry Pie Filling
- Start with your prepared raspberries: If you’ve freshly washed and measured out 6 cups of raspberries, you’re ready to go. These berries provide the rich flavor base for your pie filling.
- Add sugar and thickening agents: To your raspberries, add 2 cups of sugar (adjust according to your sweetness preference) and Clear Jel (or cornstarch). Clear Jel works wonders for canning because it gives your filling that smooth, consistent thickness, while cornstarch can be a great substitute if needed.
- Lemon juice & water: Add 2 tablespoons of lemon juice for a tangy kick, which balances out the sweetness of the raspberries. 2 ½ cups of water will help dissolve the sugar and thickening agents, creating a fluid mixture that can be simmered down into a thick filling.
🍳 Step 2: Cooking the Raspberry Mixture
- Heat and stir: Begin by heating the raspberry mixture over medium heat. Stir constantly to dissolve the sugar and thicken the mixture. Stirring helps prevent burning and ensures the filling is smooth and lump-free.
- Consistency Check: As you cook the mixture, it will start to thicken. You’ll know it’s ready when the filling is gel-like and coats the back of a spoon. Don’t rush this process—it usually takes about 10-15 minutes. If needed, you can adjust the consistency with more Clear Jel or cornstarch, as mentioned earlier.
🧂 Step 3: Perfecting the Flavors
- Adjust sweetness: If the raspberry mixture isn’t sweet enough for your liking, feel free to add a bit more sugar or another natural sweetener such as maple syrup.
- Add a pinch of salt or lemon zest for an extra burst of flavor, if desired. The salt helps balance out the sweet and tart flavors, while lemon zest enhances the freshness of the raspberries.
🍴 Step 4: Canning the Raspberry Pie Filling
- Once your mixture is ready and the consistency is spot on, it’s time to fill your sterilized jars.
- Use a funnel: Carefully ladle the hot raspberry filling into your warm, sterilized jars using a canning funnel. Make sure to leave about 1-inch of headspace at the top of the jar to allow for expansion during processing.
- Wipe the rims: After filling the jars, wipe the rims with a clean cloth to remove any residue that could prevent the lids from sealing properly.
- Apply the lids and rings: Place the lids on the jars and tighten the rings just until they’re snug, not too tight.
🎨 Step 5: Presentation Tips for Canning Raspberry Pie Filling
Presentation isn’t just for serving—it starts with the canning process! Here’s how you can add a personal touch to your RECIPE FOR CANNING RASPBERRY PIE FILLING for extra charm:
- Label your jars: Use pretty labels to identify the contents of your jars. You can write the name of the recipe, the date of canning, and any additional serving suggestions.
- Decorate the lids: Try wrapping the lid with fabric or twine for a rustic look. You can also add small decorative tags or stickers to make the jars stand out as a thoughtful gift.
- Storage Tip: Store your jars in a cool, dark place. When you’re ready to use them, you can display them proudly in your kitchen or pantry as a reminder of your homemade raspberry filling!
🍰 Serving and Using Your Raspberry Pie Filling
Once your RECIPE FOR CANNING RASPBERRY PIE FILLING is ready to go, it can be used in so many different ways! Here are some ideas for serving it:
Gifts from the Kitchen: Canning your raspberry pie filling in beautiful jars makes an excellent homemade gift for friends and family.
Classic Raspberry Pie: Pour your raspberry filling into a prepared pie crust, top it with a buttery lattice crust, and bake for a sweet, classic treat.
Tarts & Pastries: This raspberry filling is perfect for individual mini tarts or as a filling for Danish pastries.
Drizzle over ice cream or pancakes: Add a spoonful of this raspberry filling to your morning pancakes or ice cream for a delicious fruity topping.
Storage and Make-ahead Tips for Your Raspberry Pie Filling
Once your RECIPE FOR CANNING RASPBERRY PIE FILLING is complete, proper storage is essential to maintain freshness and quality. Whether you’re canning your filling for later use or planning to enjoy it soon, here are some essential tips to help you store it properly:
1. Proper Canning Storage
- Cool and Dry Location: After canning, ensure your jars are stored in a cool, dry, and dark place. A pantry or cellar is perfect for this. Properly sealed jars can last up to a year, allowing you to enjoy fresh raspberry pie filling all year round.
- Ensure Proper Seals: Check the seals on the jars after they’ve cooled. If the lid doesn’t pop when you press in the center, it’s sealed correctly. A failed seal should be stored in the fridge and used within a few days.
- Labeling and Date: Don’t forget to label your jars with the date of canning. This helps keep track of the shelf life and ensures you use them within the optimal time frame.
2. Storing Leftover Filling (Post-Pie Baking)
- In the Fridge: After you’ve baked your pie and have some leftover raspberry filling, store it in an airtight container in the refrigerator for up to 4-5 days.
- Freezing: If you have a significant amount left over, you can freeze the filling. Simply transfer it to a freezer-safe container, leaving space for expansion, and store it for up to 3 months. When ready to use, thaw it overnight in the fridge or heat it on the stovetop until warm.
Make-Ahead Tips for Easy Use
- Pre-make Raspberry Filling: If you’re planning a busy week ahead, why not double the batch and store extra jars? The RECIPE FOR CANNING RASPBERRY PIE FILLING can be prepared weeks or even months in advance—just pop the jars into storage and you’ll have a ready-to-go filling whenever you’re craving pie!
- Use for Other Desserts: Having this filling on hand also means you can quickly prepare raspberry desserts whenever you need them—whether it’s a quick tart, cobbler, or cheesecake topping. The make-ahead aspect of this recipe makes it incredibly versatile.
🎨 Recipe Variations: Get Creative with Your Raspberry Pie Filling
This RECIPE FOR CANNING RASPBERRY PIE FILLING offers a lot of room for creativity, so feel free to experiment and make it your own! Here are a few fun variations to try:
1. Mix with Other Berries
- Strawberry Raspberry Pie Filling: Combine raspberries with strawberries for a delicious, sweet-and-tart blend.
- Berry Medley: Use a mix of blueberries, blackberries, and raspberries for a colorful and complex filling that’s bursting with flavor.
2. Add a Zesty Twist
- Citrus Infused: Add a bit of orange zest or lime juice for a zesty, citrusy note that contrasts beautifully with the natural sweetness of the raspberries.
- Herbal Infusion: If you like experimenting with flavors, add a bit of fresh basil or mint for a surprising herbal note in your raspberry filling.
3. Swap the Thickening Agent
- Use Arrowroot Powder: If you prefer a natural thickening agent, try swapping Clear Jel with arrowroot powder, which is also perfect for canning.
- Low-Sugar Version: For a low-sugar alternative, you can use stevia or monk fruit sweetener to reduce the sugar content without sacrificing flavor.
4. Incorporate Spices
- Cinnamon or Nutmeg: Adding a dash of cinnamon or nutmeg can give your raspberry filling a warm, cozy flavor—perfect for the fall season!
- Vanilla Bean: For an added layer of flavor, scrape some vanilla bean into the filling or add a teaspoon of pure vanilla extract.
🎉 Conclusion: Experiment and Enjoy!
Now that you know how to make and store your RECIPE FOR CANNING RASPBERRY PIE FILLING, the possibilities are endless! This filling is not just limited to pies—use it to top pancakes, fill pastries, or mix it into yogurt for a sweet treat. Experiment with different variations to suit your taste and dietary needs, and most importantly—enjoy the process! The versatility of this recipe means you can easily adapt it to any occasion, whether it’s a holiday feast, a birthday celebration, or a simple family dinner.
So grab your jars, your raspberries, and start canning! Your homemade raspberry pie filling is just waiting to bring delicious, fresh flavors to your kitchen.